[주의!] 문서의 이전 버전(에 수정)을 보고 있습니다. 최신 버전으로 이동
분류

 상위 문서: CentOS
1. 개요 [편집]
- 이 문서는 CentOS (버전7.9기준) 설치 방법을 기술한 문서 입니다.
- CentOS 7 은 작성일 기준 EOS(서비스 지원 중단) 되었지만, 라이브 환경에 가장 많이 설치되어있는 버전입니다.
- 본 문서는 기본적인 구성에 대한 이해를 돕기 위한 문서이며 실제 라이브 환경의 파티션 구성 및 상세 설정은 다를 수 있습니다.
2. 설치 USB 만들기 [편집]
2.1. ISO 다운로드 [편집]

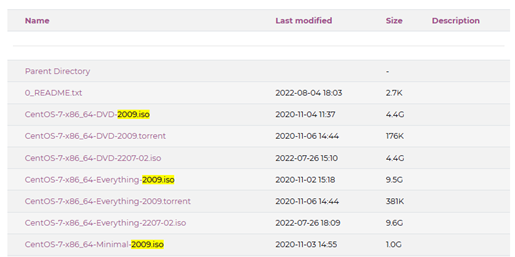
- CentOS-7-x86_64-Minimal-2009.iso : 최소 설치 버전의 ISO
- CentOS-7-x86_64-DVD-2009.iso : 기본 설치 버전의 ISO
- CentOS-7-x86_64-Everything-2009.iso : 전체 설치 버전의 ISO
해당 설치 가이드는 'Minimal'버전을 기준으로 설치 진행함.
2.2. Rufus 다운로드 [편집]
2.3. 이미지 제작 [편집]
준비된 USB 에 다운로드 받은 ISO 를 선택하고 시작 버튼 클릭
3. OS 설치 [편집]
4. 환경 구성 [편집]
4.1. resolv.conf 수정 [편집]
[root@localhost ~]# vi /etc/resolv.conf
...
nameserver 8.8.8.8
...
resolv.conf 설정 이후 원격 재 접속 시 dns 질의가 발생하여 접속이 느려질 수 있습니다.
해당 경우 resolv.conf에서 nameserver 삭제 후 재 접속 하면 해결 가능합니다.
4.2. repo 변경 [편집]
CentOS 7의 공식 repository는 EOS/EOL 되어 서비스가 불가능한 상황임으로,
따라서 사내 등 공인망 환경에서는 repo를 사용 가능한 다른 곳으로 설정해야합니다.
따라서 사내 등 공인망 환경에서는 repo를 사용 가능한 다른 곳으로 설정해야합니다.
- YUM 리포지토리 설정 파일 열기
[root@localhost ~]# vi /etc/yum.repos.d/CentOS-Base.repo - 리포지토리 설정 값 수정하기(아래 내용을 복사)
    [base]
    name=CentOS-$releasever - Base
    #mirrorlist=http://mirrorlist.centos.org/?release=$releasever&arch=$basearch&repo=os&infra=$infra
    baseurl=http://vault.centos.org/7.9.2009/os/$basearch/
    gpgcheck=1
    gpgkey=file:///etc/pki/rpm-gpg/RPM-GPG-KEY-CentOS-7

    [updates]
    name=CentOS-$releasever - Updates
    #mirrorlist=http://mirrorlist.centos.org/?release=$releasever&arch=$basearch&repo=updates&infra=$infra
    baseurl=http://vault.centos.org/7.9.2009/updates/$basearch/
    gpgcheck=1
    gpgkey=file:///etc/pki/rpm-gpg/RPM-GPG-KEY-CentOS-7

    [extras]
    name=CentOS-$releasever - Extras
    #mirrorlist=http://mirrorlist.centos.org/?release=$releasever&arch=$basearch&repo=extras&infra=$infra
    baseurl=http://vault.centos.org/7.9.2009/extras/$basearch/
    gpgcheck=1
    gpgkey=file:///etc/pki/rpm-gpg/RPM-GPG-KEY-CentOS-7

    [centosplus]
    name=CentOS-$releasever - Plus
    #mirrorlist=http://mirrorlist.centos.org/?release=$releasever&arch=$basearch&repo=centosplus&infra=$infra
    baseurl=http://vault.centos.org/7.9.2009/centosplus/$basearch/
    gpgcheck=1
    enabled=0
    gpgkey=file:///etc/pki/rpm-gpg/RPM-GPG-KEY-CentOS-7
- 변경사항 적용
[root@localhost ~]# yum install epel-release
4.3. hostname 설정 [편집]
[root@localhost ~]# hostnamectl set-hostname testServer --static
--static 옵션을 사용하면 대소문자를 구분하여 적용됩니다.
4.4. 부팅 시 런레벨 설정 [편집]
 [root@localhost ~]# systemctl set-default multi-user.target
 [root@localhost ~]# systemctl get-default
 multi-user.target
4.5. selinux 해제 [편집]
[root@localhost ~]# vi /etc/sysconfig/selinux
...
SELINUX=disabled
...
4.6. 방화벽 해제 [편집]
[root@localhost ~]# systemctl disabled --now firewalld
4.7. 불필요한 데몬 종료 [편집]
[root@localhost ~]# systemctl disable --now NetworkManager
[root@localhost ~]# systemctl disable --now abrt-ccpp
[root@localhost ~]# systemctl disable --now abrtd
[root@localhost ~]# systemctl disable --now atd
[root@localhost ~]# systemctl disable --now auditd
[root@localhost ~]# systemctl disable --now kdump
[root@localhost ~]# systemctl disable --now netconsole
[root@localhost ~]# systemctl disable --now messagebus
데몬 종료 후 su 실행이 느려지면
systemctl restart systemd-logind 실행하면 됩니다.4.8. swap 파티션 해제 [편집]
[root@localhost ~]# swapoff -a
[root@localhost ~]# sed -i.bak -r 's/(.+ swap .+)/#\1/' /etc/fstab
4.9. 시간 동기화 설정 [편집]
[root@localhost ~]# yum install -y chrony
[root@localhost ~]# systemctl enable --now chronyd
[root@localhost ~]# systemctl status chronyd
[root@localhost ~]# chronyc sources
4.10. ssh 보안 설정 [편집]
[root@localhost ~]# vi /etc/ssh/sshd_config
...
Port 2233
...
PermitRootLogin no
...
MaxAuthTries 3
...
X11Forwarding yes
...
4.11. 일반 사용자 생성 [편집]
[root@localhost ~]# useradd -d /home/sysadmin -s /bin/bash sysadmin
[root@localhost ~]# passwd sysadmin

New password: 패스워드 입력
Retype new password: 패스워드 입력
passwd: all authentication tokens updated successfully
4.12. 일반 사용자의 root 접근 권한 설정 (sudo) [편집]
- su 명령어와 관련된 PAM 설정 파일
[root@localhost ~]# vi /etc/pam.d/su - 아래 줄 주석 해제
...
auth     required      pam_wheel.so use_uid
... - 일반 사용자의 변경된 권한 적용
[root@localhost ~]# gpasswd -a sysadmin wheel
[root@localhost ~]# chgrp wheel /usr/bin/su
[root@localhost ~]# chmod 4750 /usr/bin/su
4.13. 필수 패키지 설치 [편집]
[root@localhost ~]# yum install yum-utils net-tools wget